Creating OData end point and get data in CRM using Virtual Entities
A virtual entity is a definition of an entity in the Dynamics 365 platform metadata without the associated physical tables for entity instances created in the Dynamics 365 database. Instead during runtime, when an entity instance is required, its state is dynamically retrieved from the associated external system. Each virtual entity type is associated with a virtual entity data provider and (optionally) some configuration information from an associated virtual entity data source.
Records based on virtual entities are available from all Dynamics 365 (online) clients, including custom applications developed using the Dynamics 365 SDK.
Virtual entities provide these benefits:
End users work with the records created by the virtual entity to view the data in fields, grids, search results, and Fetch XML-based reports and dashboards.
System customizers can configure the data source record and create virtual entities without writing any code.
Developers can implement plugins to read external data using the Dynamics 365 SDK and Dynamics 365 (online) Plug-in Registration tool.
However Virtual entities have some limitations as well:
Data is read-only
Only organization-owned entities are supported
Field-level security is not supported
It must be possible to model the external data as a Dynamics 365 entity. This means:
All entities in the external data source must have an associated GUID primary key
All entity properties must be represented as Dynamics 365 attributes - you can use simple types representing text, numbers, option sets, dates, images, and lookups
You must be able to model any entity relationships in Dynamics 365
In this blog I am going to explain how we can create our own OData end point to be used as Virtual Entity Data Source in Dynamics 365.
For now, I am using a static list of records. You can use your own Database.
Before creating our end point, we need to take care that the table we are going to access must have an associated GUID primary key.
1.
Create OData End Point
To create an OData end point follow
below steps I Visual Studio:
a. Open
Visual Studio and create New Project
from Web Templates of type “ASP.Net Web Application” and give it a suitable name

b.
Now choose Empty Project of Web API type

c.
Now add a class Named as Person under Models
Folder:

You can see a GUID field in my model
d.
Add a New
Scaffold Item

e.
Select Microsoft
OData v4 Web API Controller from given list of items as below

f.
Select Model
Class and create New Context (Use
Persons.Models.PersonsModelContext):

And Add it to your project.
g.
You can see PersonModelContext.cs
file added in Models:

h.
Open WebApiConfig.cs file from App_Start folder
and change it as follows:
using System;
using System.Collections.Generic;
using System.Linq;
using System.Web.Http;
using System.Web.OData.Builder;
using System.Web.OData.Extensions;
using Persons.Models;
namespace Persons
{
public static class WebApiConfig
{
public static void Register(HttpConfiguration config)
{
ODataConventionModelBuilder builder = new ODataConventionModelBuilder();
builder.EntitySet<Person>("Person");
config.MapODataServiceRoute("odata", "odata", builder.GetEdmModel());
}
}
}
i.
Now back to our Controller and change it as
below:
using System;
using System.Collections.Generic;
using System.Data;
using System.Data.Entity;
using System.Data.Entity.Infrastructure;
using System.Linq;
using System.Net;
using System.Net.Http;
using System.Web.Http;
using System.Web.ModelBinding;
using System.Web.OData;
using System.Web.OData.Query;
using System.Web.OData.Routing;
using Persons.Models;
namespace Persons.Controllers
{
/*
The WebApiConfig class may require additional changes to add a route for this controller. Merge these statements into the Register method of the WebApiConfig class as applicable. Note that OData URLs are case sensitive.
using System.Web.OData.Builder;
using System.Web.OData.Extensions;
using Persons.Models;
ODataConventionModelBuilder builder = new ODataConventionModelBuilder();
builder.EntitySet<Person>("People");
config.MapODataServiceRoute("odata", "odata", builder.GetEdmModel());
*/
public class PeopleController : ODataController
{
private PersonsModelContext db = new PersonsModelContext();
// GET: odata/People
// GET: odata/Person
[EnableQuery]
[ODataRoute("Person")]
public IQueryable<Person> GetPersons()
{
List<Person> list = new List<Person>{
new Person{Id=new Guid("11111111-1111-1111-1111-111111111111"), Name = "Sourav",SurName="kayal",Age="26"},
new Person{Id=new Guid("22222222-2222-2222-2222-222222222222"), Name = "Ram",SurName="Das",Age="25"},
new Person{Id=new Guid("33333333-3333-3333-3333-333333333333"), Name = "Shyam",SurName="Das",Age="24"},
new Person{Id=new Guid("44444444-4444-4444-4444-444444444444"), Name = "Ankur",SurName="Das",Age="23"},
new Person{Id=new Guid("55555555-5555-5555-5555-555555555555"), Name = "Sandeep",SurName="Das",Age="22"},
new Person{Id=new Guid("66666666-6666-6666-6666-666666666666"), Name = "Gurpreet",SurName="Singh",Age="21"},
new Person{Id=new Guid("77777777-7777-7777-7777-777777777777"), Name = "Prabhjot",SurName="Singh",Age="20"}
};
return list.AsQueryable<Person>();
}
public Person Get(Guid key)
{
List<Person> list = new List<Person>{
new Person{Id=new Guid("11111111-1111-1111-1111-111111111111"), Name = "Sourav",SurName="kayal",Age="26"},
new Person{Id=new Guid("22222222-2222-2222-2222-222222222222"), Name = "Ram",SurName="Das",Age="25"},
new Person{Id=new Guid("33333333-3333-3333-3333-333333333333"), Name = "Shyam",SurName="Das",Age="24"},
new Person{Id=new Guid("44444444-4444-4444-4444-444444444444"), Name = "Ankur",SurName="Das",Age="23"},
new Person{Id=new Guid("55555555-5555-5555-5555-555555555555"), Name = "Sandeep",SurName="Das",Age="22"},
new Person{Id=new Guid("66666666-6666-6666-6666-666666666666"), Name = "Gurpreet",SurName="Singh",Age="21"},
new Person{Id=new Guid("77777777-7777-7777-7777-777777777777"), Name = "Prabhjot",SurName="Singh",Age="20"}
};
return list.FirstOrDefault(x => x.Id == key);
}
}
}
j.
Now your OData end point is ready. You can
publish it on azure and test it as below:

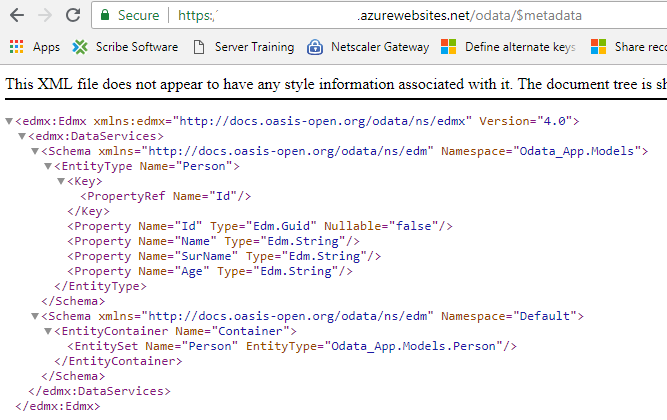
k.
To view meta data you can simple access as
below:
2.
Create Virtual Entity Data Source in Dynamics
365
Moving on to our next step of creating Virtual Entity Data Source.
For this Navigate to
Settings>>Administration>>Virtual Entity Data Sources in your
Dynamics 365

Create new Data Source here by selecting OData v4 Data Provider

Enter data as below:

Don’t forget to add URL
for your hosted API.
3.
Create Virtual Entity in Dynamics 365
Now our next step is create Virtual
Entity.
Navigate to Settings>>Customization>>Customize
the System
And create a new Entity by
providing information as below:

4.
Map fields from OData end point to Dynamics 365
fields
Now add Fields to this entity. Please keep in mind
that External Name of fields must be same as name of Properties in your class
(in OData end point)
Below are screenshots explaining it:
1.
Primary Key

2.
Name:

3.
Age:

4.
Surname:

5.
Change view and add all columns in view:

6.
Publish your customizations and you can see
records in Dynamics 365

So now you are all set to create
your own OData service end point and get data in dynamics 365
Happy CRMing. 😊
Regards,
Preeti Sharma

No comments:
Post a Comment